Naptime Gnome Idea #3
Blogger vs. WordPress, Featuring Knit Tee Rescue
After a fairly hearty onslaught of poor reviews regarding the functionality of this blog creator, I’ve decided to devote this naptime to compare Blogger and WordPress, and what better way to test their strengths and weaknesses than to give WordPress a go…so, um… here we go (CLICK to read the rest of the post on WordPress)!
WordPress Site Name: http://naptimegnome.wordpress.com
Thanks everyone for your patience!
Happy reading and please let me know what you think-
Naptime Gnome <;)
Friday, August 30, 2013
Tuesday, August 27, 2013
DIY Fabric Covered Label Windows
Naptime Gnome Idea #2
Add a Custom Fabric Label Window to Just About Anything!


 Time to Complete: 1 naptime to make 3-5 (possibly more if you're quick, or they are super sleepy!)
Making the Denim Form

 2. Fold in half (either landscape or portrait, doesn't matter).
Measure the width you would like the edge of the window to be (these are 1/2"
frames). Remember,
that once you wrap the denim with fabric, it will be slightly wider,
but the difference is only about 1/16" - 1/8" of an inch. Keeping the frame folded, mark the inner edge of the frame.
Using three straight cuts, cut the upper, then lower line, then remove
the center by cutting the third edge between them.
2. Fold in half (either landscape or portrait, doesn't matter).
Measure the width you would like the edge of the window to be (these are 1/2"
frames). Remember,
that once you wrap the denim with fabric, it will be slightly wider,
but the difference is only about 1/16" - 1/8" of an inch. Keeping the frame folded, mark the inner edge of the frame.
Using three straight cuts, cut the upper, then lower line, then remove
the center by cutting the third edge between them.
 3. When you unfold the
fabric, you should have a relatively symmetrical, rectangular frame.
Trim any frays or wavy edges.
3. When you unfold the
fabric, you should have a relatively symmetrical, rectangular frame.
Trim any frays or wavy edges.
Preparing the Cover Fabric
 4. Place your frame on your cover fabric and measure approximately 1/5" out from the form, on all four sides. Mark and cut.
5. Mark the approximate center and inner corners with small dots. These will be your guides for cutting the inner portion of your cover fabric to make the "window." I used dry-erase marker on this vinyl. You can use a pattern marker/pencil or a sliver of soap if using a darker fabric.
 6. Fold the cover fabric diagonally and bite into it at a perpendicular angle with your scissors. This should be the beginning of your slit from the opposite or diagonally oriented marks. Carefully extend your cut to the dots on either side.
7. Insert the scissors halfway down the diagonal slit and cut to the remaining dots on either side, making an "X." NOTE: DO NOT CUT BEYOND THE MARK. If you cut too far, the frame will be exposed underneath. You can always snip a bit more if you need to, but "you may never come back" (and if you didn't hear that ethereal echo in the background, you may have to rent the movie "All Dogs Go to Heaven."
Wrapping the Denim Form
 8. Now it's time to get our wrap on. :) Place the cover face down and position the denim form with the "X" peeking through the window.
9. Pull the triangular cut flaps up and outward to wrap the inner perimeter of the frame. Pin and repeat with each triangular flap. Flip over and inspect the corners, if the frame is fairly well covered... GREAT JOB! If any flaps look a bit loose, or the inner edges look uneven, one at a time, unpin the offending flaps, reposition, pin and continue.
 10. Trim the portions of the wrapped flaps that exceed the denim frame. This will reduce the bulk when your wrap the outer edge.
 11. Fold the flaps in to cover the outer perimeter of the form. If you are using a fabric that can be safely ironed, this would be an excellent place to whip out the iron, and simply press the folds as you make them to keep them crisp.
 My vinyl would have shriveled into a little charred ball, so it took a little more effort to keep the edges looking crisp. To get nice square corners, I tried "gift wrapping" by making little triangular folds, but only resulted in bulky rounded corners. Ultimately, it was easiest to fold the flaps in on either side and pin.
THEN, doing the bottom and top, being careful to keep the folds tucked in. The next few steps outline this technique more clearly. So if you have clean corners, just skip to step 12.

11a. Fold the bottom (or top if you desire) flap, by first pinching the fold so the fabric doesn't slide diagonally, then fold it directly up (or down if doing the top).
 11b. Pin the corner in place, temporarily.
 11c. Then
smooth out the flap and pinch the other corner fold and pull up to
pin, being careful to keep the fold tucked in. Repeat for the last
flap.
11c. Then
smooth out the flap and pinch the other corner fold and pull up to
pin, being careful to keep the fold tucked in. Repeat for the last
flap.

Stitch Into Place
 12. Using your desired thread, top-stitch in place by sewing first around the outer edge. This makes it safe to remove your pins as you go, as the tips of your inner flaps should extend to your stitch. Then stitch your inner edge. I chose to stitch use an 1/8" margin, but you can sew between 1/8" and 1/16" from the edge of your frame with a window this size.
Attach to Desired Object
 13. Now that you have a beautiful little frame, you'll need to attach it to something in need of organizing! You can attach by stitching into place by top-stitching (using a running stitch) right over the top of 3 of your outer stitch lines, or you can use glue, again, only on three sides. The open edge will allow you to slip in your tags. On this project I left the top open because the pack will usually be upright. But you could also put them on the side, which on some items may lay nicer.
NOTE: If gluing, be careful to use just a very thin line of glue along the VERY outer edge, so you will leave space for your label cards. If gluing to fabric, fabric glue, or fusing tape (if your fabric can be ironed) are probably your best bets, but you may want to use something a bit more substantial if you are gluing to paper, wood, plastic or metal. I've never had much luck with fabric glue bonding to anything but fabric, and of course, me. I'm a fan of the newer white and yellow glues: Titebond, Elmer's Glue-All, and Liquid Nails (though this may be overkill! :) always seem to get the job done. Stay away from Gorilla Glue or Super/Krazy Glue for this, as they tend to misbehave a bit with fabric, plus they make a big fat mess.
Design Designer Labels
14. Your labels should be slightly smaller than the space within your outer stitching perimeter, but bigger than the window so they don't jump out. I've found a light cardstock or even printable business cards seem to stay put the best. Measure and establish your desired label size, about 1/4" narrower and about a 1/4" shorter than the outer stitched edge should do the trick.
15. You can hand write the labels and be done (YAY!), or you can print them using a word-processing or image creator/editor program.
 16. Cut your labels to fit, slide in, stuff your box, basket, or other receptacle with ONLY what is printed on it. Harass mercilessly, any individual that does otherwise... or simply reorganize their sock drawer...

ENJOY!
The Naptime Gnome
Crafty Gnome Key:
1 Crafty Gnome = Simple cutting, gluing, tracing, and/or painting, etc.
2 Crafty Gnomes = Any of the above, plus the use of a few tools, and may involve a sewing machine for some simple seams... nothing crazy.
3 Crafty Gnomes = Could require some practice with any of the above items, and/or could involve power tools (you'll meet Burly Gnome soon enough)
4 Crafty Gnomes = Includes most or all of the above... A bear of a project or requires a bit of help.
5 Crafty Gnomes = Perhaps a bit sorry I attempted it.
Add a Custom Fabric Label Window to Just About Anything!

The gnomes responsible for cleaning-up around here all really appreciate labels! For some reason, even when everyone knows the rightful home of various household items, things have a much higher likelihood of ending up in their homes, if a label is involved. Thus, freeing up more time for the clean-up gnomes! As I double as a clean-up gnome, I am particularly fond of these handy little devices. The best kind of labels are those that can be changed at will, with little hassle. This makes chalkboards really high on my list of awesome decorating tools, but the clean lines of label windows are right up there!

Here are some label windows, hard at work, in the "mud room" portion of the new laundry room remodel.
You won't be hard pressed to find all sorts of baskets, folders and various other organizers adorned with these household helpers, but what about adding them to your own projects, or items you already have? Here is a quick (honest, they really don't take long, the tutorial is just very thorough to account for various skill/experience levels), easy way to make label windows with items you probably already have in your home.
These windows were custom made for the little bear's new backpack. We wanted a way to minimize the bulk of his preschool pack, while increasing the functionality... this is code for "make sure nothing gets lost on the way to teacher/show and tell or back home again." Enter Naptime Gnome with one-of-a kind "folder pack," complete with labelled pockets.

So grab a cup of your favorite warm and snugly beverage and join us for some label making!
DIY Label Windows
Crafty Gnomes: 2, for minimal sewing skill
(See the Crafty Gnome Key Below)
Note: If you don't have a machine,
you could definitely glue them
using fabric glue or fusible tape.
 Time to Complete: 1 naptime to make 3-5 (possibly more if you're quick, or they are super sleepy!)
Supplies and Tools
- Old jeans or other denim/stiff canvas material (cut-off legs from shorts, or old bits of canvas drop-cloth are great)
- Fabric to cover (here I used a felt backed vinyl tablecloth)
- Coordinating thread
- Scissors
- Ruler
- Straight pins
- Paper for labels
- Printer for printing labels (if your handwriting looks anything like mine!:) Optional
Making the Denim Form

 2. Fold in half (either landscape or portrait, doesn't matter).
Measure the width you would like the edge of the window to be (these are 1/2"
frames). Remember,
that once you wrap the denim with fabric, it will be slightly wider,
but the difference is only about 1/16" - 1/8" of an inch. Keeping the frame folded, mark the inner edge of the frame.
Using three straight cuts, cut the upper, then lower line, then remove
the center by cutting the third edge between them.
2. Fold in half (either landscape or portrait, doesn't matter).
Measure the width you would like the edge of the window to be (these are 1/2"
frames). Remember,
that once you wrap the denim with fabric, it will be slightly wider,
but the difference is only about 1/16" - 1/8" of an inch. Keeping the frame folded, mark the inner edge of the frame.
Using three straight cuts, cut the upper, then lower line, then remove
the center by cutting the third edge between them. 3. When you unfold the
fabric, you should have a relatively symmetrical, rectangular frame.
Trim any frays or wavy edges.
3. When you unfold the
fabric, you should have a relatively symmetrical, rectangular frame.
Trim any frays or wavy edges.Preparing the Cover Fabric
 4. Place your frame on your cover fabric and measure approximately 1/5" out from the form, on all four sides. Mark and cut.
5. Mark the approximate center and inner corners with small dots. These will be your guides for cutting the inner portion of your cover fabric to make the "window." I used dry-erase marker on this vinyl. You can use a pattern marker/pencil or a sliver of soap if using a darker fabric.
 6. Fold the cover fabric diagonally and bite into it at a perpendicular angle with your scissors. This should be the beginning of your slit from the opposite or diagonally oriented marks. Carefully extend your cut to the dots on either side.
7. Insert the scissors halfway down the diagonal slit and cut to the remaining dots on either side, making an "X." NOTE: DO NOT CUT BEYOND THE MARK. If you cut too far, the frame will be exposed underneath. You can always snip a bit more if you need to, but "you may never come back" (and if you didn't hear that ethereal echo in the background, you may have to rent the movie "All Dogs Go to Heaven."
Wrapping the Denim Form
 8. Now it's time to get our wrap on. :) Place the cover face down and position the denim form with the "X" peeking through the window.
9. Pull the triangular cut flaps up and outward to wrap the inner perimeter of the frame. Pin and repeat with each triangular flap. Flip over and inspect the corners, if the frame is fairly well covered... GREAT JOB! If any flaps look a bit loose, or the inner edges look uneven, one at a time, unpin the offending flaps, reposition, pin and continue.
 10. Trim the portions of the wrapped flaps that exceed the denim frame. This will reduce the bulk when your wrap the outer edge.
 My vinyl would have shriveled into a little charred ball, so it took a little more effort to keep the edges looking crisp. To get nice square corners, I tried "gift wrapping" by making little triangular folds, but only resulted in bulky rounded corners. Ultimately, it was easiest to fold the flaps in on either side and pin.
THEN, doing the bottom and top, being careful to keep the folds tucked in. The next few steps outline this technique more clearly. So if you have clean corners, just skip to step 12.

11a. Fold the bottom (or top if you desire) flap, by first pinching the fold so the fabric doesn't slide diagonally, then fold it directly up (or down if doing the top).
 11b. Pin the corner in place, temporarily.
 11c. Then
smooth out the flap and pinch the other corner fold and pull up to
pin, being careful to keep the fold tucked in. Repeat for the last
flap.
11c. Then
smooth out the flap and pinch the other corner fold and pull up to
pin, being careful to keep the fold tucked in. Repeat for the last
flap. 
Stitch Into Place
 12. Using your desired thread, top-stitch in place by sewing first around the outer edge. This makes it safe to remove your pins as you go, as the tips of your inner flaps should extend to your stitch. Then stitch your inner edge. I chose to stitch use an 1/8" margin, but you can sew between 1/8" and 1/16" from the edge of your frame with a window this size.
 Attach to Desired Object
 13. Now that you have a beautiful little frame, you'll need to attach it to something in need of organizing! You can attach by stitching into place by top-stitching (using a running stitch) right over the top of 3 of your outer stitch lines, or you can use glue, again, only on three sides. The open edge will allow you to slip in your tags. On this project I left the top open because the pack will usually be upright. But you could also put them on the side, which on some items may lay nicer.
NOTE: If gluing, be careful to use just a very thin line of glue along the VERY outer edge, so you will leave space for your label cards. If gluing to fabric, fabric glue, or fusing tape (if your fabric can be ironed) are probably your best bets, but you may want to use something a bit more substantial if you are gluing to paper, wood, plastic or metal. I've never had much luck with fabric glue bonding to anything but fabric, and of course, me. I'm a fan of the newer white and yellow glues: Titebond, Elmer's Glue-All, and Liquid Nails (though this may be overkill! :) always seem to get the job done. Stay away from Gorilla Glue or Super/Krazy Glue for this, as they tend to misbehave a bit with fabric, plus they make a big fat mess.
Design Designer Labels
14. Your labels should be slightly smaller than the space within your outer stitching perimeter, but bigger than the window so they don't jump out. I've found a light cardstock or even printable business cards seem to stay put the best. Measure and establish your desired label size, about 1/4" narrower and about a 1/4" shorter than the outer stitched edge should do the trick.
15. You can hand write the labels and be done (YAY!), or you can print them using a word-processing or image creator/editor program.


ENJOY!
The Naptime Gnome
Crafty Gnome Key:
1 Crafty Gnome = Simple cutting, gluing, tracing, and/or painting, etc.
2 Crafty Gnomes = Any of the above, plus the use of a few tools, and may involve a sewing machine for some simple seams... nothing crazy.
3 Crafty Gnomes = Could require some practice with any of the above items, and/or could involve power tools (you'll meet Burly Gnome soon enough)
4 Crafty Gnomes = Includes most or all of the above... A bear of a project or requires a bit of help.
5 Crafty Gnomes = Perhaps a bit sorry I attempted it.
Sunday, August 25, 2013
How to get a fancy New Vegas buffet at Old Vegas prices!
Mommy Vegas Idea #4
One of Las Vegas' Best Kept Buffet Secrets!

Early in our Vegas residency, my dad was working out of state, my brothers were off exploring the world, and my mom and I were making a sport of exploiting the cheapest eats Sin City had to offer.
With only two bellies to feed, it was easier, and sometimes even cheaper, to go out. Plus, it was fun, all huddled in a quaint booth some nauga gave its hide for, while swapping stories about our days.
It was a great time, and for two girls that love hunting out a good deal, it was a ton of fun trying to outdo our standing records. There were seriously a few places left in town where 1 - 2 bucks could get you an entire meal, and if you were willing to eat in the middle of the night, 49¢ could get you an entire breakfast at the Klondike! Granted, it wasn't seafood at the Rio, or steak at the Hilton, but if you could ignore the haze of cigarette smoke and sticky pleather booth, some of it was actually pretty good!
Many implosions later, the going rate for a decent buffet at dinner is about $40, and some are upwards of $80 a guest! While I can't say I ever LIKE paying that much to each, I can say the dining experiences to be had on the Strip can be quite extraordinary. My standing fave is the Aria, if you like tapas style dining, the experience is fantastic - particularly during their Gourmet Buffet. But a few local joints have made an effort to provide unique and exotic fare alongside comfort food faves, which tend to be a bit easier on the billfold! The Stations, including Red Rock and Green Valley Ranch, usually have pretty good eats at reasonable prices. Particularly if you go for breakfast or lunch, and midweek prices are often even better! Be sure to get their players' club card, "The Boarding Pass," if you haven't already. This handy little card signs you up for all sorts of specials and events, and earns you points to redeem for various benefits, but germane to the topic of cheap eats, gets you oodles of buffet options under ten bucks!
I've had a few good meals at the Cannery and Arizona Charlies properties too, but the best, without question, that I've had thus far, has been The M. While a little pricier than some of the other local hangouts, the food is consistently excellent, and delightfully diverse. Additionally, the property is simply stunning, well manicured and in a nicer part of town, if you can call the very tippity edge of our desert island part of "town." We've had great luck with freshness, and the selection is so wide that even the pickiest eaters have no trouble, while the adventurers will find plenty of exotic salads and sausages, sushi and soups, and desserts, desserts, desserts! A fun added bonus is the inclusion of selected wines and beers on tap... and even an espresso and gelato bar. I'm a fan of their own Microbrew Cider, personally. OH, and munchkins 4 and under are FREE!
Dinner at the M's Studio B Buffet, isn't cheap. At $23.99 during the week and $39.99 for their Seafood Buffet (Friday - Sunday), you aren't paying much less than Strip prices. But have no fear! There is a simple trick to getting oodles of great food at pub prices. If your schedule allows, why not gather for a weekday brunch? Monday - Friday breakfast is only $10.99, $5.99 if you happen to have California ID (I know, so unfair for us locals, but remember to remind yourself how much we love the money they share with our economy!).
There's a reason breakfast is so inexpensive, there really isn't much out yet, the bar isn't open, the desserts are neatly hiding behind the counter... it's just not the full Studio B experience... until 10:30, when EVERYTHING comes out to play. SO, the trick is to get there AND PAY BEFORE 10:30 AM, but late enough to not have to wait 2 hours for a bit of creme brulee... that being said, the line isn't usually half bad between 10 and 10:15. Cut it too close, and you may start to feel like you're waiting for Mickey's autograph at Disneyland. Now, if you happen to miss the breakfast deal, no worries, its only $5 more for lunch, but that can add up with a larger group. So be sure to try mid-week "brunch" at the M and let us know about your favorite family deals and tricks for great eats in Vegas!
Happy Eating!
-Candice
P.S: If you don't mind a slightly longer walk to the food, ask your host(ess) if you may sit near the windows. Studio B at The M has a solarium dining space with huge floor to ceiling windows. The view of the Valley is spectacular.
Wednesday, August 14, 2013
Children's Museum, Beautiful NEW Location
Mommy Vegas Idea #3
Discover the Discovery Museum All Over Again!

Every time I suggest we visit the Children's Museum my son matter-of-factly objects, but suggests we visit the "NEW" Children's Museum instead, as if the old one is still an option. There was nothing wrong with the old location, it's just that the new one is JUST SO RIGHT. In fact, he would argue, as many others seem to - if you've only visited the Museum back when it was located on North Las Vegas Boulevard, you simply haven't been to the Children's Discovery Museum!
With its slightly new name, fancy new address in the Smith Center complex, fantastic cast of employees and volunteers, new lower entrance fee, and beautiful new building packed with charming, exciting, informative, and fun new exhibits, we're struggling to find anything wrong with the new digs! Oh, maybe one thing - with so much to see and do, it's no easy task squeezing it all into one visit, but there's even a great solution to that dilemma: the annual pass options are TOTALLY worth it!
I wish I could show you in pictures, but the place is always so packed we can't get any pictures without a few munchkins slipping in, and I'm not in the business of posting other people's kids on the internet! :) So here we go:
-Candice
Discover the Discovery Museum All Over Again!

Every time I suggest we visit the Children's Museum my son matter-of-factly objects, but suggests we visit the "NEW" Children's Museum instead, as if the old one is still an option. There was nothing wrong with the old location, it's just that the new one is JUST SO RIGHT. In fact, he would argue, as many others seem to - if you've only visited the Museum back when it was located on North Las Vegas Boulevard, you simply haven't been to the Children's Discovery Museum!
With its slightly new name, fancy new address in the Smith Center complex, fantastic cast of employees and volunteers, new lower entrance fee, and beautiful new building packed with charming, exciting, informative, and fun new exhibits, we're struggling to find anything wrong with the new digs! Oh, maybe one thing - with so much to see and do, it's no easy task squeezing it all into one visit, but there's even a great solution to that dilemma: the annual pass options are TOTALLY worth it!
I wish I could show you in pictures, but the place is always so packed we can't get any pictures without a few munchkins slipping in, and I'm not in the business of posting other people's kids on the internet! :) So here we go:
- The new imaginative play area has a beautiful zero-rise stage (so not even the littles will fall from stardom), complete with a kid-operated lighting and sound booth, oodles of props, costumes and plenty of seating for the audience (read: "benches so Mom and Dad can catch a breather"). The grand stage is flanked by two less-traditional stages. With just a little imagination, a spacious ship can go from HMS Discovery, to a vessel of scallywags under the Jolly Roger, to the USS Discovery all in a matter of moments. Once the ship returns to port, cue the costume change in the dressing area located on the other side of the zero-rise stage, and on to the adjacent two story Castle for the next Act.
- Haven't had enough imaginative play? Head up to "Eco-City" and try those little hands at veterinary medicine, construction, aviation, auto mechanics, retail or commerce.
- The toddler area for kids five and under, and their siblings, is a nice place to escape when it's crowded (we'll have to keep this in mind when school starts and the field trips start flooding in!).
- The water works has several stations with something for everyone, including tiny rain coats! Little Bug is a HUGE fan of the scaling. She couldn't reach the water tables at the previous location (which always spurred much frustration from her and a sore back for Mommy), but now she can happily approach much of the exhibit and interact just like the big kids - HUGE PLUS!
- You'll also find an expanded new physics/engineering center, to build and test inventions.
- A spacious traveling gallery space.
- Extensive art center with plenty of ways to explore texture, color, light, space and more!
- A health and diet exhibit very similar to the one in the previous location with some fun new twists.
- And don't leave without solving the mystery in "Mystery Town!" Where your kiddos can try their hand at archaeology and forensic science techniques.
- Get there when they open. Some Fridays, weekends and holidays, the line can provide over an hour wait, once the museum meets capacity. So get there early, just in case.
- Plus, even when it's not packed, the activity tower, with it's 12 or so floors of fun exhibits and habitrail like tunnels and slides, gets so crazy it's nearly impossible to stick together. So hit this up the second you get there, at least on your first visit.
- Check out the listing of demonstrations and activities on the digital kiosk (see below), located near the center of each floor, then plan your attack around where each session you may want to attend is located. It can be a challenge to wrangle the crew from a fun activity on the 1st floor, all the way to the third floor without much notice.

- Be prepared to get wet, messy, or both! With the great new water works and interactive art area, squeaky wet shoes and paint dipped sleeves may be unintentional souvenirs, but well worth it!
- Bring snacks or pack a lunch. Like the previous location there aren't many places nearby to grab a bite. But don't let that cut your trip short. If you're desperate, your hand stamp will get you back in even after a trip down to the Premium Outlet Mall for a quick lunch.
- Consider the annual pass. Keep your receipt. After your visit, if you think you'd like to come back a few more times, stop by the front desk on your way out. If you opt to become a member, they will deduct your entry fees if you buy a membership on the day of your visit! If you have a big family, or like to bring guests, be sure to ask about the Discovery Pass. Both the Family and Discovery Memberships become cost effective after two to four visits for most families.
- HAVE FUN!

-Candice
Tuesday, August 13, 2013
Pick your own produce IN Vegas!
Mommy Vegas Idea #2
Get Fresh in Vegas!

Sorry, I'm still giggling a bit about that title! :) While intentionally ambiguous, I am of course talking about fresh produce. After the post about apple processing I figured it only fitting to explore some of the better places to get apples in the first place, as I'm going to go out on a limb and assume that not everyone has access to a family orchard. So here we go, best places we've found to acquire fresh produce in Las Vegas:

There are truly countless learning moments to be had on this expansive property, whether it's as simple as discovering eggplants do not grow "eggs" (one of our sillier moments!), or chasing down a rogue grasshopper just to check out those fantastic jumping legs, city kids will definitely get their fill of wonder at this beautiful historic site.
Be sure to check their website in advance or sign-up for their newsletter that arrives neatly in your email box once a week. They have a wide variety of fruits and veggies in the fields and orchard so come ready to work, because these treats don't pick themselves! If you do happen to be in a hurry or just not in the mood to scavenge the rows, there are usually some great pre-picked options at checkout (though it varies by season, you may find melons, potatoes, onions, garlic, or squash), along with various fresh peanut/almond butters, ciders, honey and more.
Most fresh produce is $1/pound, with fresh leafy greens being slightly more, and melons, some squash and large zucchini being between $0.25 and $0.50/lb. The processed items, like peanut butter and cider, are not the cheapest around, but they're definitely worth trying. Our faves are the apple cider and the Sweet and Gritty peanut butter.
Don't forget the wagon, comfy shoes and bags or baskets for your finds!
Happy Picking!
-Candice
Get Fresh in Vegas!

Sorry, I'm still giggling a bit about that title! :) While intentionally ambiguous, I am of course talking about fresh produce. After the post about apple processing I figured it only fitting to explore some of the better places to get apples in the first place, as I'm going to go out on a limb and assume that not everyone has access to a family orchard. So here we go, best places we've found to acquire fresh produce in Las Vegas:
- The Obvious: Grocery Stores. While I love our neighborhood Smith's, and I must admit it has excellent customer service and variety, very little of the produce is local, and barring an amazing sale, the prices are pretty average. If you are in to juicing, you have to check out Food-4-Less, you can get large quantities of produce for great prices, particularly when they run specials, but it's not my favorite shopping experience. I will admit though, when the weekly mailer boasts 5/$1 avocados or $0.50/lb nectarines, I set my aversion aside and go shopping. Sometimes I come up with a sweet deal on kale, or tangerines, but I've been let down time and time again by inedible avocados, tiny little munchkin stone fruit with MASSIVE pits, and apples that lack flavor, which tends to make the deals a little less sweet. The best value I've found has been at the Mexican markets in town. Granted, you do have to be a little careful, because while I've had some really great luck, like Food-4-Less, I've also seen some questionable fare. Cardenas is a fun one, checkout what people are saying on Yelp!
- The Trendy: Farmers' Markets. I don't even have to buy anything to enjoy a good farmers' market. Up until just a few years ago, I would have said, there really isn't one to speak of here, but just recently they seem to be cropping up all over. You have to go in with the proper mindset though. You can't expect a Las Vegas area farmers' market to compare to a Pacific Northwest, California, or Midwest market; you'll simply be left wanting. That being said, there is still a great time and some yummy eats to be had, pretty much any day of the week, most of the year. Here are a few fun ones we've tried in the past:
- Fresh52 - One of the bigger markets, they have several locations open Friday, Saturday or Sunday, we've only been to the one at Town Square (Fridays) to date, but have heard great things about Tivoli Village (maybe a future post?). Be sure to check out their website, this is a true treasure that many people have really put a lot of fine work into!
- Downtown 3rd (3rd Street Farmer's Market)- This Friday market is located in the old bus depot. It's mostly indoors, but be prepared, it still gets rather warm in the Summer months. There is often live entertainment and plenty of venders with ready-to-eat and prepared food, making this an excellent spot for a fun Friday lunch to kick off the weekend!
- Country Fresh Farmers Market - On Thursdays you can catch this market in the Henderson Events Plaza on Water Street in Downtown Old Henderson (sometimes you can spot us dancing in the water feature after snagging some lunch). Fridays, this market sets up shop off Green Valley Parkway just outside The Pavilion, in the same complex as the Paseo Verde Library and Multi-Generational Center. This market is a fairly small market so it may be worth pairing with a trip to the library or a dip in one of the Multi-Gen pools.
- THE EXPERIENCE: Gilcrease Orchard

There are truly countless learning moments to be had on this expansive property, whether it's as simple as discovering eggplants do not grow "eggs" (one of our sillier moments!), or chasing down a rogue grasshopper just to check out those fantastic jumping legs, city kids will definitely get their fill of wonder at this beautiful historic site.
Be sure to check their website in advance or sign-up for their newsletter that arrives neatly in your email box once a week. They have a wide variety of fruits and veggies in the fields and orchard so come ready to work, because these treats don't pick themselves! If you do happen to be in a hurry or just not in the mood to scavenge the rows, there are usually some great pre-picked options at checkout (though it varies by season, you may find melons, potatoes, onions, garlic, or squash), along with various fresh peanut/almond butters, ciders, honey and more.
Most fresh produce is $1/pound, with fresh leafy greens being slightly more, and melons, some squash and large zucchini being between $0.25 and $0.50/lb. The processed items, like peanut butter and cider, are not the cheapest around, but they're definitely worth trying. Our faves are the apple cider and the Sweet and Gritty peanut butter.
Don't forget the wagon, comfy shoes and bags or baskets for your finds!
Happy Picking!
-Candice
Saturday, August 10, 2013
Apples, Apples, and more... APPLES! Cheap and easy fruit processing ideas.
Naptime Gnome Idea #1
Manzana Mania!

I have the sweetest memories of sitting on the counter helping my mom process apples as a kid. We dried most of them in a dehydrator. Once they were dry I helped pack the bags. Eat one, put one in the bag, eat one, put one in the bag.... luckily they always came back from Apple Hill, Ca., with a Suburban FULL of apples!
It was the annual "girls' trip" and the fruit, they picked themselves or purchased at roadside stands, lasted us through the year. Since we never really ate sweets as kids, it was our version of candy. I still feel a little naughty sitting down with a bag full of dried fruit. I REALLY love apples! I also happen to really LOVE free. So, it only follows that I REALLY LOVE free apples!!!
As luck would have it, we have an uncanny abundance of ridiculously talented people in our family (I can assure you there is no bias here), and you will meet more of them in greater depth in the future. But for now, and the focus of this post, the outcome of Grandpa's green thumb, and Grandma's organization skills and how they land ME oodles of delicious FREE apples every year. THANK YOU GRANDMA AND GRANDPA! I LOVE YOU!!!
Between Grandma's keen eye on the calendar, prompting time sensitive orchard tending and Grandpa's gardening magic, their trees came up with an unparallelled bumper crop of apples. So after a day of picking, in which I somehow managed to wrangle kiddos all day, while Super Hubby (the only one, I may add, that wanted nothing to do with the picking in the first place) and Grandpa ("The Incredible"), picked enough apples to warm my little heart, but fill my laundry room with brimming vessels.
Did you sense that little touch of cynicism towards the end, nope, not your imagination, legit - here's why...
Two major events have recently transpired in the world of the Nap Gnome:
Of course there was so much to do in the waking hours the Gnome was forced to allow us common folk to help a bit with the apple processing. The kidlets really enjoyed working the apple corer, and the sampling, always the sampling! So while the Gnome was originally slightly stressed at the prospect of this undertaking, it turned out that she rather enjoyed sharing the burden and the shift to cooler work hours! It's no wonder so many desert creatures opt for crepuscular habits, who wouldn't want to spend all their time out and about when the oven they call home is merely preheating?
Speaking of OVEN, that brings us to the favored methods of processing said apples. While everyone else is complaining about how blasted hot it is in Southern Nevada in the Summer, the Gnome has gone and used it to her advantage, so here we go!

Sun-Drying!
This was actually a happy accident we stumbled upon a few years ago when I borrowed my mom's old dehydrator (that hadn't been used in a decade, maybe two... but is that really relevant?:).
So here's the back story, after getting all the trays loaded with cleaned, cored, skinned and sliced apples (insert dance of joy here). Situating the dehydrator out on the back patio (so it wouldn't unnecessarily heat up the house), plugging it in, loading it with said trays, turning it on and... CLICK... what?... Try that again... CLICK... uh oh.

 It was in that moment, that it occurred to me, while standing in the backyard in VEGAS in AUGUST, that we lived in a great big dehydrator (ok, I know, should have been a little quicker on that one).
So I removed the tiles from our patio table to allow better air flow, set the trays in the sun with a fan blowing over the array to keep the flies away (which turned out to be overkill as not even the flies will brave Vegas in August, even to snag a free lunch), and presto, Mother Nature's dehydrator! The following year and hither to, I simplified to no fan, and just a big sheet of solar screen (purchased at the Lowe's end of the year sidewalk sale for a couple bucks) laid out over the tile-less table to allow for more apples. About 6 hours later, perfectly dried apples, ready to bag!
I prefer to bag them in plain paper lunch bags as they are less likely to stick together and they also make for cute, fast and simple gifts with the addition of two holes and a bit of ribbon. The little plastic bag pictured below represents one apple. That's right, about 12 slices with a standard cork-screw corer/peeler (like this one) adds up to one apple... be careful with your portions... very... very... careful! Unless, of course, you are looking to, um, get things moving.

Basic Fruit Leather Directions
 These keep at least a year. We've never had one make it much longer than that, simply because I have to hide them just to get them to last THAT long. So their actual shelf-life is still undetermined by us. I just like to have them around until the next apple season!
MIX IT UP!
Try mixing various fruits and fruit juices. This year we thawed some cranberries that had been hiding in the freezer since Thanksgiving and juiced them to add to the apples. The result was quite tasty. We also juiced the last of the grapes from our vines to make apple-grape. The third variety we played with this year was mostly apple and apple juice mixed with a handful of thawed mixed berries. So far, "apple-berry" is Little Bear's favorite!
Sweeter Treats
I've read recipes in the past that add sweetener like honey, granulated sugar, corn syrup or agave. I've never tried sweetening with anything but juice, but if you find yours are too tart, it may be worth a try! For a lower sugar leather you can use water instead of juice, it just evaporates off and leaves the fruit behind, but it tends to be less pliable.
Add some protein
I also tried a few with yogurt (basically did a generic smoothy recipe with plain yogurt, frozen bananas, apples, berries and apple juice). I liked the result, but I think I was the only one in the house that was a fan. You have to make sure you do not go too thin when pouring, as it cracked very easily while drying.
Apple Sauce
We've tried various apple sauce recipes and methods over the years, and honestly, I don't think you can screw up apple sauce, but some are definitely better than others. We are not into canning, mostly because it's a pain and requires more sugar than I like to use, but we freezer can as an alternative.
Last year Mom and I attempted my grandparents tried and true recipe using a "Squeezo," after two batches we decided that was way too much of a mess and we seemed to be loosing as much product as we were making. The recipe we liked best was a crockpot method we found on the internet and I used a similar one this year.
You'll find I NEVER strictly stick to a recipe, so here is the link to the inspiration, and below is the method we used:
Baby Food and Baking Apple Sauce
We always do some no sugar/no cinnamon added. I like to freeze these in ice cube trays to use as baby food and for baking (the best part is when you want to make cookies just take out as many cubes as you need - measure your tray recesses by pouring water into one cubby and dumping into a measuring cup - and let them thaw in the mixer for a half hour and then add the rest of the ingredients. My ice cube trays are 1/8 cup (larger than average) so I never have to "measure," just grab and toss!
Instant Dessert All Year!
Apple crisp is only moments away! Also great as apple compote on pancakes or waffles. The sweeter varieties can be spread like apple butter too. The dessert monsters around the house liked the full cup of sugar with a bit more cinnamon, left chunky, and then baked in a pie plate with a buttery crumble on top. YUM!

Hungry? There's an App(le) for that!
P.S.:Do you have a favorite apple recipe? DO SHARE!!
Manzana Mania!

I have the sweetest memories of sitting on the counter helping my mom process apples as a kid. We dried most of them in a dehydrator. Once they were dry I helped pack the bags. Eat one, put one in the bag, eat one, put one in the bag.... luckily they always came back from Apple Hill, Ca., with a Suburban FULL of apples!
It was the annual "girls' trip" and the fruit, they picked themselves or purchased at roadside stands, lasted us through the year. Since we never really ate sweets as kids, it was our version of candy. I still feel a little naughty sitting down with a bag full of dried fruit. I REALLY love apples! I also happen to really LOVE free. So, it only follows that I REALLY LOVE free apples!!!
As luck would have it, we have an uncanny abundance of ridiculously talented people in our family (I can assure you there is no bias here), and you will meet more of them in greater depth in the future. But for now, and the focus of this post, the outcome of Grandpa's green thumb, and Grandma's organization skills and how they land ME oodles of delicious FREE apples every year. THANK YOU GRANDMA AND GRANDPA! I LOVE YOU!!!
Between Grandma's keen eye on the calendar, prompting time sensitive orchard tending and Grandpa's gardening magic, their trees came up with an unparallelled bumper crop of apples. So after a day of picking, in which I somehow managed to wrangle kiddos all day, while Super Hubby (the only one, I may add, that wanted nothing to do with the picking in the first place) and Grandpa ("The Incredible"), picked enough apples to warm my little heart, but fill my laundry room with brimming vessels.
Did you sense that little touch of cynicism towards the end, nope, not your imagination, legit - here's why...
Two major events have recently transpired in the world of the Nap Gnome:
- The recent nap boycott, spearheaded by Little Bear, has limited the midday work session, at least until school starts in a few weeks (apparently the Gnome Labor Union has no pull in such matters).
- SOMEBODY inundated her beautiful new laundry room with apples!
Of course there was so much to do in the waking hours the Gnome was forced to allow us common folk to help a bit with the apple processing. The kidlets really enjoyed working the apple corer, and the sampling, always the sampling! So while the Gnome was originally slightly stressed at the prospect of this undertaking, it turned out that she rather enjoyed sharing the burden and the shift to cooler work hours! It's no wonder so many desert creatures opt for crepuscular habits, who wouldn't want to spend all their time out and about when the oven they call home is merely preheating?
Speaking of OVEN, that brings us to the favored methods of processing said apples. While everyone else is complaining about how blasted hot it is in Southern Nevada in the Summer, the Gnome has gone and used it to her advantage, so here we go!

Sun-Drying!
This was actually a happy accident we stumbled upon a few years ago when I borrowed my mom's old dehydrator (that hadn't been used in a decade, maybe two... but is that really relevant?:).
So here's the back story, after getting all the trays loaded with cleaned, cored, skinned and sliced apples (insert dance of joy here). Situating the dehydrator out on the back patio (so it wouldn't unnecessarily heat up the house), plugging it in, loading it with said trays, turning it on and... CLICK... what?... Try that again... CLICK... uh oh.

 It was in that moment, that it occurred to me, while standing in the backyard in VEGAS in AUGUST, that we lived in a great big dehydrator (ok, I know, should have been a little quicker on that one).
So I removed the tiles from our patio table to allow better air flow, set the trays in the sun with a fan blowing over the array to keep the flies away (which turned out to be overkill as not even the flies will brave Vegas in August, even to snag a free lunch), and presto, Mother Nature's dehydrator! The following year and hither to, I simplified to no fan, and just a big sheet of solar screen (purchased at the Lowe's end of the year sidewalk sale for a couple bucks) laid out over the tile-less table to allow for more apples. About 6 hours later, perfectly dried apples, ready to bag!
I prefer to bag them in plain paper lunch bags as they are less likely to stick together and they also make for cute, fast and simple gifts with the addition of two holes and a bit of ribbon. The little plastic bag pictured below represents one apple. That's right, about 12 slices with a standard cork-screw corer/peeler (like this one) adds up to one apple... be careful with your portions... very... very... careful! Unless, of course, you are looking to, um, get things moving.

Fruit Leather
Fruit leather, fruit strips, or fruit roll-ups, whatever your family calls them, I don't think I've met a kid that doesn't appreciate one now and again, and again, and again! The best part is they're super easy and you can use up all the scraps to make them!
Basic Fruit Leather Directions
- Fill a blender about halfway with peeled and pitted fruit. The corer mentioned above is great for this too.
- Add juice (you only need enough to allow the fruit to blend smooth), if the fruit is drier you'll need more. With apples I usually end up adding almost enough juice to cover, but start blending with about half that much and add as needed to keep things mixing.
- Pour onto a smooth (the smoother the better), non-stick surface. I use silicone mats on cookie sheets. But you can also cover cookie sheets with aluminum foil and spray with cooking spray.
- Spread the mixture evenly to about 1/4" thick. Any thin spots could result in holes, but pouring too thick may not dry completely and may not keep.
- Place in the sun, away from trees where things may drop on it (or worse, get bird bombed!)
- Dry until it peels cleanly from the surface (they take the better part of the day in dry weather). If it feels tacky to the touch in the middle, you got some time to wait gnome-girl.
- If they are not dry by nightfall, bring them in and store in the fridge overnight and start again in the morning, or place in the oven at 100℉ (38 - 40℃) until dry. Otherwise you may end up with sampled goods once the mice come out to play! ~ Unfortunately, I'm speaking from experience... darn mouse!
- Once dry, peel and cut to desired shape/size, roll in plastic wrap or place in a sandwich bag.


MIX IT UP!
Try mixing various fruits and fruit juices. This year we thawed some cranberries that had been hiding in the freezer since Thanksgiving and juiced them to add to the apples. The result was quite tasty. We also juiced the last of the grapes from our vines to make apple-grape. The third variety we played with this year was mostly apple and apple juice mixed with a handful of thawed mixed berries. So far, "apple-berry" is Little Bear's favorite!
Make your own juice
You can use store-bought juice if you like, but we usually have so many mangled apples that we like to juice the ones we've cut boo-boos out of and use the thick juice (too thick to drink without straining) in the blender with the dry pithy apples, as they do not stick together well enough to peel nice "rings" apart to dry. I also juice the skins that come off the corer and 2/3's of the core (I toss the seed portion). The pithy waste makes a great addition to compost or you can run it down the garbage disposal. I once attempted to make cookies with it. I was unpopular with the dessert monsters for some time to follow.
Sweeter Treats
I've read recipes in the past that add sweetener like honey, granulated sugar, corn syrup or agave. I've never tried sweetening with anything but juice, but if you find yours are too tart, it may be worth a try! For a lower sugar leather you can use water instead of juice, it just evaporates off and leaves the fruit behind, but it tends to be less pliable.
Add some protein
I also tried a few with yogurt (basically did a generic smoothy recipe with plain yogurt, frozen bananas, apples, berries and apple juice). I liked the result, but I think I was the only one in the house that was a fan. You have to make sure you do not go too thin when pouring, as it cracked very easily while drying.
Apple Sauce
We've tried various apple sauce recipes and methods over the years, and honestly, I don't think you can screw up apple sauce, but some are definitely better than others. We are not into canning, mostly because it's a pain and requires more sugar than I like to use, but we freezer can as an alternative.
Last year Mom and I attempted my grandparents tried and true recipe using a "Squeezo," after two batches we decided that was way too much of a mess and we seemed to be loosing as much product as we were making. The recipe we liked best was a crockpot method we found on the internet and I used a similar one this year.
You'll find I NEVER strictly stick to a recipe, so here is the link to the inspiration, and below is the method we used:
- Fill a standard Crockpot with peeled, cored, sliced apples
- Add 1/2 to 1 cup of sugar (OPTIONAL)
- Cook on low until soft (5 - 6 hours)
- Stir periodically
- Add cinnamon to taste if desired
- Mash with a potato masher or toss in the blender or mixer to make a smoother sauce
- Pour into jars, let cool, and store in the freezer (lasts at least a year in the freezer, a week or so in the fridge)
Baby Food and Baking Apple Sauce
We always do some no sugar/no cinnamon added. I like to freeze these in ice cube trays to use as baby food and for baking (the best part is when you want to make cookies just take out as many cubes as you need - measure your tray recesses by pouring water into one cubby and dumping into a measuring cup - and let them thaw in the mixer for a half hour and then add the rest of the ingredients. My ice cube trays are 1/8 cup (larger than average) so I never have to "measure," just grab and toss!
Instant Dessert All Year!
Apple crisp is only moments away! Also great as apple compote on pancakes or waffles. The sweeter varieties can be spread like apple butter too. The dessert monsters around the house liked the full cup of sugar with a bit more cinnamon, left chunky, and then baked in a pie plate with a buttery crumble on top. YUM!

ENJOY!
P.S.:Do you have a favorite apple recipe? DO SHARE!!
Thursday, August 8, 2013
*FREE* Aquarium and Scavenger Hunt with MVP (Mommy Vegas Printable!)
Mommy Vegas Idea #1
Get Wild in the Great Indoors!
In the mood for a picnic, but worried the kids may melt? How about moving the party indoors, with some not-so-wild, wildlife?
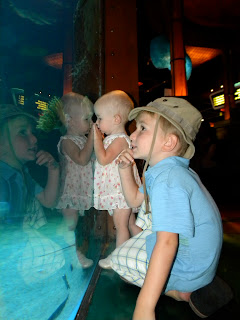
 If you haven't yet checked out "The Best Free Attraction in Las Vegas," it's time! The aquarium at the Silverton is beautifully maintained and offers some fun educational perks. If the kids get into The Little Mermaid, this is a must. The mermaid shows are fun for the little ones and if you time it right, you can catch the feeding show on the same visit. Check their website for up to date show schedules, as they do change seasonally.
The shows both feature divers that interact with the crowd from inside the tank. The feeding shows also feature a knowledgeable docent that helps field questions from the audience.
Get there a bit early to get the kids up close and personal. We like to pack a low-mess lunch to enjoy tank-side while playing "I spy." My 14-month-old Little Bug even gets in on it, pointing at every pretty critter that happens by.
 If you go in the evening, you may want to round out the evening with dinner at one of their restaurants. We had great luck at the Seasons Buffet (checkout what yelp has to say).
Want an extra dose of educational fun, but lacking in the Marine Biology department? Camp-out near the scrolling informational kiosk (see first pic). Read the posts and then go "fishing" for the finned feature!
When you've had your fishy fill, head over to Bass Pro Shops to check out the other tanks and their extensive collection of "stuffed animals."
Need to spice it up a bit, or keep the kids busy a little longer? Try out our Mommy Vegas Printable (MVP) Scavenger Hunt!
Happy fishing... and hunting too!
-Candice
Get Wild in the Great Indoors!
In the mood for a picnic, but worried the kids may melt? How about moving the party indoors, with some not-so-wild, wildlife?

The shows both feature divers that interact with the crowd from inside the tank. The feeding shows also feature a knowledgeable docent that helps field questions from the audience.
Get there a bit early to get the kids up close and personal. We like to pack a low-mess lunch to enjoy tank-side while playing "I spy." My 14-month-old Little Bug even gets in on it, pointing at every pretty critter that happens by.

Want an extra dose of educational fun, but lacking in the Marine Biology department? Camp-out near the scrolling informational kiosk (see first pic). Read the posts and then go "fishing" for the finned feature!
When you've had your fishy fill, head over to Bass Pro Shops to check out the other tanks and their extensive collection of "stuffed animals."
Need to spice it up a bit, or keep the kids busy a little longer? Try out our Mommy Vegas Printable (MVP) Scavenger Hunt!
Happy fishing... and hunting too!
-Candice
Tuesday, August 6, 2013
Let's start at the very beginning...
Mommy Vegas and the Naptime Gnome.... WHHAAAT?
I'm the kind of person that get's bored easily, this coupled with my desire to learn new things, try just about anything, and spend as little money as humanly possible, has led me to explore my surroundings in a slightly more active way than some have the time or inclination to. I also like pretty things, and I don't let my cheap, I mean "thrifty," side hinder my potential to be surrounded by pretty things, both in our home and away. These tendencies have spurred me to think outside the box a bit and be more creative, making old new and creating fun even where it may be hard to find.
While working in community outreach education and teaching I became even more interested in the sites and activities available in and around the Las Vegas Valley. Before I became a mother I was able to share this information with hundreds and even thousands of children on a weekly basis. In the past few years my audience has shrunk substantially, but I still love sharing our adventures and discoveries with friends and family, often to find people have no idea how much there is to do here. In fact, I’m regularly shocked to hear people woefully report how little there is in Las Vegas for families.
In the last few months many of my friends and family, and even a few random people I'd met while out and about, had suggested I start a blog. After the first two suggestions I thought, “Why would I want to add to the mindless, unreviewed, strictly-void-of-the-editorial-process babble already in existence on the web?” After the fifth or sixth recommendation, I started to do some market research: What is to be found in the wide world of blogs anyway? After sifting through countless blogs, mostly those written by stay-at-home moms, what I found was a pool of educated, insightful, interesting people, with so much to share. There were, of course, plenty of daily journals and accounts obviously devoted to keeping the family/friends in the loop too, but I became excited to possibly join a community of moms that have found a way to share and be heard, while still learning from others, often in the same wee hours I keep. You know, those hours when it’s inappropriate to pick up the phone or visit any place reputable.
I have to admit, with every suggestion that I write a blog, I started to wonder if people really thought I was interesting enough that I should share with others, or if I was so boring that they preferred I find an outlet that could easily be ignored! So here’s hoping for the prior, and in an attempt to avoid the latter, I’ve narrowed my vast interests to just a few categories... what we do when everyone’s awake... and what happens when most everyone is asleep! Doesn’t sound like it should narrow it down much does it?! Well, with any luck, it should leave us with things to do for family fun (the Mommy Vegas part), and DIY projects around the house (that’s where the Naptime Gnome comes in).
So the “Mommy Vegas” bit is clear, “...but what’s with the Gnome?,” you may ask.

First a little background:
So I have a confession to make. We have a bit of a Gnome problem around our home. We began noticing it around the time my husband and I moved in together. We shared a precious bear-cave on the edge of town and loved every moment, but our time together was limited as the hubby had recently taken a job with beaucoup responsibility and a hefty commute and I was living at, I mean, attending grad school, teaching and doing research. We were like ships passing in the... no actually, the nights where the BEST! It was the short moments of putting away dishes, packing lunches, and general household stuff that we didn’t connect on at first. I had moved into his place, so all of his belongings had a home, but our lack of time together meant mine found homes in his absence.
It was all going swimmingly until I started noticing my stuff mysteriously disappearing, it started small: the ENTIRE carton of ice cream I had just dipped my little spoon into for a little taste, the re-purposed plastic containers I saved to pack delightful leftovers to brighten lonely lunches, the lightly used ziploc bags I washed and placed back in the drawer for reuse, the LIDS, only the LIDS, of my “reusable” water bottles, you know, the fancy models with “Aquafina” and “Deja Blue” emblazoned on the sides, and the list goes on. Ok, I was a bit of a hoarder. He started noticing strange things as well, socks being paired and rolled before being tucked into their drawer, projects being started and left to be finished (sometimes for inappropriately lengthy periods), and so forth. WE were never home enough to have committed such OBVIOUSLY grievous crimes, and our time together was so precious we never had a moment to bring up the incidents.
One day, while cursing a blue streak of my finest British expletives (its probably critical to imagery to remind you I am 100% made in the USA) in the throws of artfully disemboweling the kitchen cupboards in search of a single yogurt container lid, or possibly a margarine container, I finally decided to confront my assailant(s).
It wasn’t a long correspondence, just a sticky note that went something like:
Proud, and admittedly a bit smug, I crammed my lunch into a NEW Ziploc bag (the HORROR!) and headed out. That evening it became clear that war had been waged in my absence, the note featured a large jagged portion resembling the relief of a dental arch... some gnome had taken a BITE out of my note! The hubby was just as astounded at the response, that’s when we knew we had a gnome problem.
Over the years, as with any other pest, we've taken measures to reduce our run-ins with the gnomes, making accommodations like acquiring an inexpensive, matching set of compactly stored plasticware, and now that we have recycling pickup in the neighborhood many of the things I had trouble parting with have found their way to the bins. As I began to hoard less, the gnomes seemed to move on to greener pastures.
Until that is, the kids started moving freely about the house. In recent years our little gnome problem mushroomed into a full-blown infestation: car keys in the backyard, TV remotes in the freezer, cell phones in the cat’s water bowl, a menagerie of stuffed critters in the laundry shoot, and you don’t even want to know what they sneak into the washer.
But the gnomes haven’t been all mischief, in fact, we’ve discovered one that collects all the recycling and garbage and makes sure it gets to the curb - LOVE that gnome - I get a glimpse of him now and then... he's pretty cute! My other favorite does all sorts of handy things around the house, but only once the kids are in bed. We’ve named her the Naptime Gnome.
Life is good since her arrival. Though it sometimes takes a few naps for projects to meet completion: a garage sale find ceiling fan may take two naps to refinish and one to hang, while the driveway was stained over the course of 2 weeks of naps (although it did take her almost a year to finally finish the laundry room, but we won't hold that against her). Slowly, one nap at a time, our house is becoming a home. Over the years the gnome has Venetian plastered, refurbished and installed light fixtures and ceiling fans, laid mosaic tiles and installed back-splashes, built or refinished various furniture pieces, laid and stained concrete, done some minor plumbing, sewn curtains, throw pillows and various other items, landscaped and gardened, processed homegrown foods, installed artificial turf, built trellises, refinished cabinets and painted just about anything that will hold still and even a few things that won't (poor dog).
Though few know about our gnome problem, many visitors to our home have been curious about how certain things came to be. So instead of boring them with the details of how our gnome can't seem to leave anything alone, I’ve decided to cave to the prompting from friends and family (to bore them less in person ;), and burrow my own little mark into the blogosphere to share some of our creations, finds and adventures, and hopefully be lucky enough to share in some of your own ideas and adventures!
So, what’s the best place for fresh fruit in Vegas? Which parks have the best splash pads? What will the Naptime Gnome do next? Stick around and find out, and don't be shy about sharing your own ideas and questions!
I'm the kind of person that get's bored easily, this coupled with my desire to learn new things, try just about anything, and spend as little money as humanly possible, has led me to explore my surroundings in a slightly more active way than some have the time or inclination to. I also like pretty things, and I don't let my cheap, I mean "thrifty," side hinder my potential to be surrounded by pretty things, both in our home and away. These tendencies have spurred me to think outside the box a bit and be more creative, making old new and creating fun even where it may be hard to find.
While working in community outreach education and teaching I became even more interested in the sites and activities available in and around the Las Vegas Valley. Before I became a mother I was able to share this information with hundreds and even thousands of children on a weekly basis. In the past few years my audience has shrunk substantially, but I still love sharing our adventures and discoveries with friends and family, often to find people have no idea how much there is to do here. In fact, I’m regularly shocked to hear people woefully report how little there is in Las Vegas for families.
In the last few months many of my friends and family, and even a few random people I'd met while out and about, had suggested I start a blog. After the first two suggestions I thought, “Why would I want to add to the mindless, unreviewed, strictly-void-of-the-editorial-process babble already in existence on the web?” After the fifth or sixth recommendation, I started to do some market research: What is to be found in the wide world of blogs anyway? After sifting through countless blogs, mostly those written by stay-at-home moms, what I found was a pool of educated, insightful, interesting people, with so much to share. There were, of course, plenty of daily journals and accounts obviously devoted to keeping the family/friends in the loop too, but I became excited to possibly join a community of moms that have found a way to share and be heard, while still learning from others, often in the same wee hours I keep. You know, those hours when it’s inappropriate to pick up the phone or visit any place reputable.
I have to admit, with every suggestion that I write a blog, I started to wonder if people really thought I was interesting enough that I should share with others, or if I was so boring that they preferred I find an outlet that could easily be ignored! So here’s hoping for the prior, and in an attempt to avoid the latter, I’ve narrowed my vast interests to just a few categories... what we do when everyone’s awake... and what happens when most everyone is asleep! Doesn’t sound like it should narrow it down much does it?! Well, with any luck, it should leave us with things to do for family fun (the Mommy Vegas part), and DIY projects around the house (that’s where the Naptime Gnome comes in).
So the “Mommy Vegas” bit is clear, “...but what’s with the Gnome?,” you may ask.

First a little background:
So I have a confession to make. We have a bit of a Gnome problem around our home. We began noticing it around the time my husband and I moved in together. We shared a precious bear-cave on the edge of town and loved every moment, but our time together was limited as the hubby had recently taken a job with beaucoup responsibility and a hefty commute and I was living at, I mean, attending grad school, teaching and doing research. We were like ships passing in the... no actually, the nights where the BEST! It was the short moments of putting away dishes, packing lunches, and general household stuff that we didn’t connect on at first. I had moved into his place, so all of his belongings had a home, but our lack of time together meant mine found homes in his absence.
It was all going swimmingly until I started noticing my stuff mysteriously disappearing, it started small: the ENTIRE carton of ice cream I had just dipped my little spoon into for a little taste, the re-purposed plastic containers I saved to pack delightful leftovers to brighten lonely lunches, the lightly used ziploc bags I washed and placed back in the drawer for reuse, the LIDS, only the LIDS, of my “reusable” water bottles, you know, the fancy models with “Aquafina” and “Deja Blue” emblazoned on the sides, and the list goes on. Ok, I was a bit of a hoarder. He started noticing strange things as well, socks being paired and rolled before being tucked into their drawer, projects being started and left to be finished (sometimes for inappropriately lengthy periods), and so forth. WE were never home enough to have committed such OBVIOUSLY grievous crimes, and our time together was so precious we never had a moment to bring up the incidents.
One day, while cursing a blue streak of my finest British expletives (its probably critical to imagery to remind you I am 100% made in the USA) in the throws of artfully disemboweling the kitchen cupboards in search of a single yogurt container lid, or possibly a margarine container, I finally decided to confront my assailant(s).
It wasn’t a long correspondence, just a sticky note that went something like:
“Dear Kitchen Gnomes, Please be so kind as to refrain from ingesting our food storage containers and their accompanying accoutrements.”
Proud, and admittedly a bit smug, I crammed my lunch into a NEW Ziploc bag (the HORROR!) and headed out. That evening it became clear that war had been waged in my absence, the note featured a large jagged portion resembling the relief of a dental arch... some gnome had taken a BITE out of my note! The hubby was just as astounded at the response, that’s when we knew we had a gnome problem.
Over the years, as with any other pest, we've taken measures to reduce our run-ins with the gnomes, making accommodations like acquiring an inexpensive, matching set of compactly stored plasticware, and now that we have recycling pickup in the neighborhood many of the things I had trouble parting with have found their way to the bins. As I began to hoard less, the gnomes seemed to move on to greener pastures.
Until that is, the kids started moving freely about the house. In recent years our little gnome problem mushroomed into a full-blown infestation: car keys in the backyard, TV remotes in the freezer, cell phones in the cat’s water bowl, a menagerie of stuffed critters in the laundry shoot, and you don’t even want to know what they sneak into the washer.
But the gnomes haven’t been all mischief, in fact, we’ve discovered one that collects all the recycling and garbage and makes sure it gets to the curb - LOVE that gnome - I get a glimpse of him now and then... he's pretty cute! My other favorite does all sorts of handy things around the house, but only once the kids are in bed. We’ve named her the Naptime Gnome.
Life is good since her arrival. Though it sometimes takes a few naps for projects to meet completion: a garage sale find ceiling fan may take two naps to refinish and one to hang, while the driveway was stained over the course of 2 weeks of naps (although it did take her almost a year to finally finish the laundry room, but we won't hold that against her). Slowly, one nap at a time, our house is becoming a home. Over the years the gnome has Venetian plastered, refurbished and installed light fixtures and ceiling fans, laid mosaic tiles and installed back-splashes, built or refinished various furniture pieces, laid and stained concrete, done some minor plumbing, sewn curtains, throw pillows and various other items, landscaped and gardened, processed homegrown foods, installed artificial turf, built trellises, refinished cabinets and painted just about anything that will hold still and even a few things that won't (poor dog).
Though few know about our gnome problem, many visitors to our home have been curious about how certain things came to be. So instead of boring them with the details of how our gnome can't seem to leave anything alone, I’ve decided to cave to the prompting from friends and family (to bore them less in person ;), and burrow my own little mark into the blogosphere to share some of our creations, finds and adventures, and hopefully be lucky enough to share in some of your own ideas and adventures!
So, what’s the best place for fresh fruit in Vegas? Which parks have the best splash pads? What will the Naptime Gnome do next? Stick around and find out, and don't be shy about sharing your own ideas and questions!
Subscribe to:
Posts (Atom)